If you've got big storage needs and you are looking for style, this is the shed for you.
It's definitely the shed for me :) Love the Rooster weathervane.
I'm blogging about this to save it as a honey do chore aka my wish list
and share with everyone else in the process.
I have years of collectables I want to start a little secondhand shop with, and this beautiful shed, along with the 8 x 10 barn-style shed I already have will work perfectly for what I want to do. I'm hoping hubby will join the two.
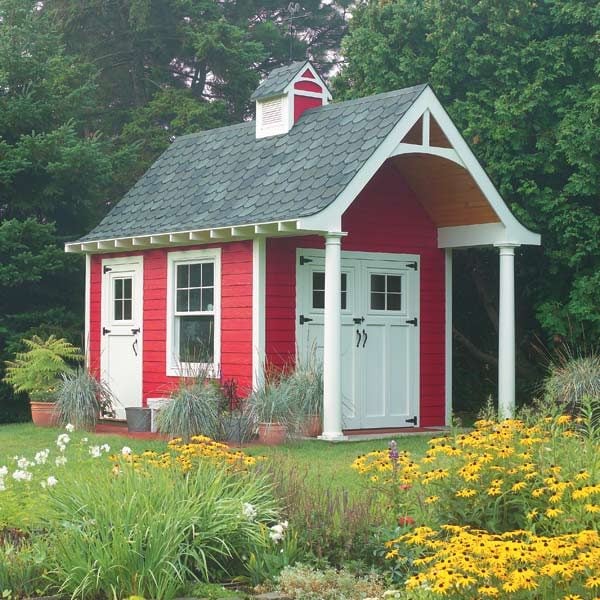
Here are complete DIY plans and instructions for building this 10-ft. x 12-ft. shed.
It has double-doors for wide access, a covered entry and fiber-cement siding for low maintenance and durability.
Schoolhouse shed overview
Step 1: Choose a level site and pour the concrete slab
Step 2: Frame the walls
Step 3: Set the columns and sheathe the walls
Step 4: Cut and assemble the rafters
Step 5: Set the rafters
Step 6: Sheathe the roof
Step 7: Install the trim and siding
Step 8: Assemble and hang the doors
Step 9: Build the cupola
Required Tools for this Project
Have the necessary tools for this DIY project lined up before you start—you’ll save time and frustration.
Level, 4-ft., Level, torpedo, Drill bit, 3/4-in., Adjustable roof bracket
Additional tools include an air nailer, a finish nailer, a band saw, gloves, a shovel and concrete smoothing tools (bull float, hand float, hand trowel, edger).
Schoolhouse shed overview
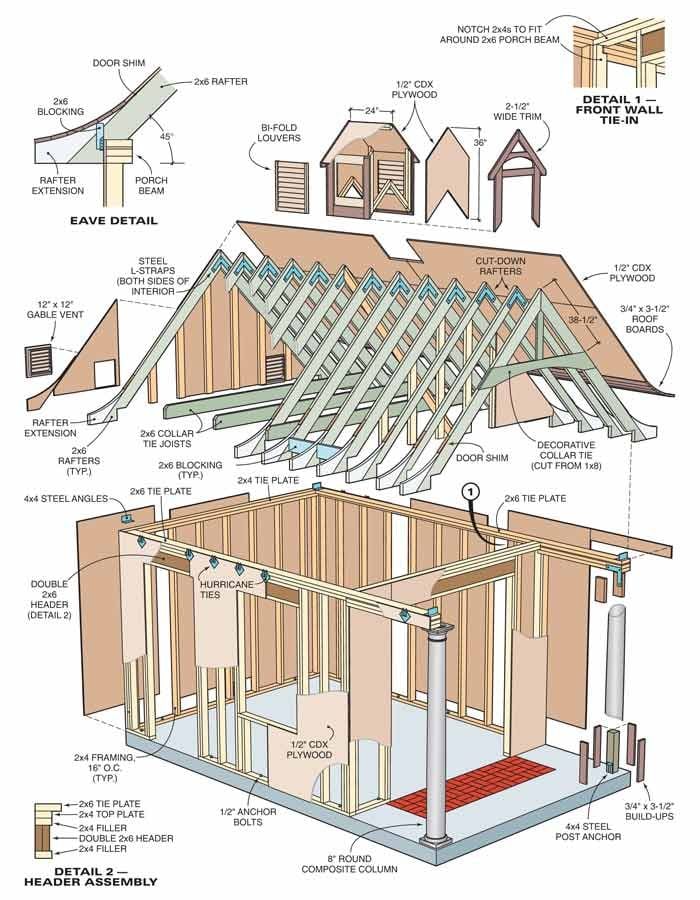
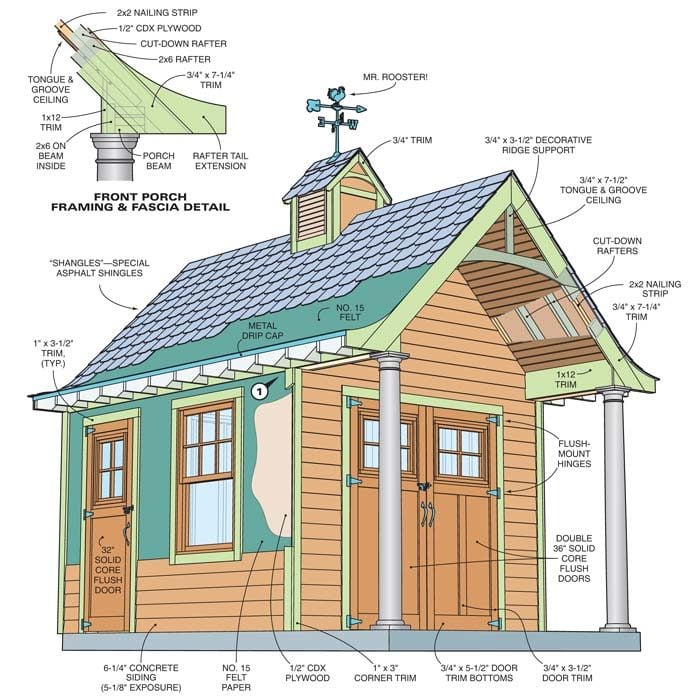
Our schoolhouse shed is a roomy 10 x 12-ft. structure with a 4 x 10-ft. entry. The double front doors provide wide access (6 ft. across) for big equipment, and the single service door is handy for getting at everyday items. The cupola on the rooftop is made to resemble an old-fashioned bell tower but isn’t just decorative.
The louvered sides draw air from the rear wall vents below, creating natural ventilation that will keep your storage items dry and odor-free. You’ll also appreciate the low-maintenance features of durable cement siding and composite trim and columns.
Building this shed isn’t difficult, but it does require a little carpentry experience. The frame is conventional: 2x4 stud walls and 2x6 rafters. Then we simply added details to the basic structure.
Our step-by-step photos and drawings show you how they all go together. Study all the details before jumping in, so you understand how everything goes together. If you don’t have time to do it all, farm out parts of the project, such as the concrete slab. (I have to admit that I love concrete work. My adrenaline starts pumping when I hear the roar of the delivery truck!)
Don’t feel overwhelmed by the size of the project. You don’t have to complete it in a week. It’s the kind of project that you can spread over an entire season, knocking off a chunk each week. This project took another carpenter and me about six full days to complete, so if you’ve helped your neighbors several times on their projects, it’s time to call in the favors.
Step 1: Choose a level site and pour the concrete slab
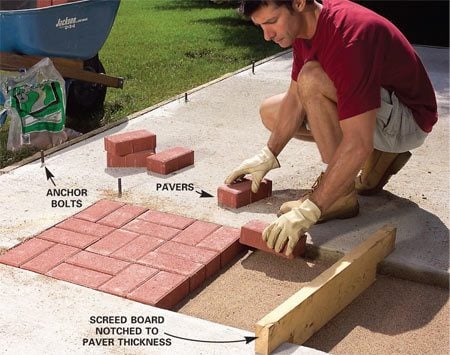
Photo 1: Pour the slab and set the pavers
Pour the concrete base and set the anchor bolts. Screed the sand over a concrete base with a notched 2x4. Set the pavers even with the concrete.
Choose a level and easily accessible site. If your back yard is fairly flat, you’re in luck. A slope of 5 in. over 12 ft. is easily accommodated with the thickness of the slab. If you have a greater slope, you may have to build a retaining wall and add fill to get a level site.
Make sure to position the building conveniently to access all your gear, and think a bit about how you’re going to get all that concrete back to the building site. Keep in mind that a heavy truck can damage your yard and driveway. To avoid any problems, we wheelbarrowed all our concrete to the back yard from the foot of the driveway. It took more than 2-1/2 cubic yards of concrete, or about 30 wheelbarrow trips! We had a slight slope in the back yard, but it was manageable (or so my younger helpers told me).
Before you excavate and build the concrete forms, call your utilities to make sure you won’t disturb any buried lines in the yard. You’ll only be digging about 6 in. in the deepest spot, but you’ll also be driving stakes into the ground. Rent a sod cutter to remove the turf from your building site and then dig out the footprint (Figure A) plus a foot of wiggle room on each side. Set one side of the 2x6 forms perfectly level and then level the other sections to it. Drive stakes about 1 ft. deep to support the forms from the outside, and screw the forms to the stakes.
You’ll notice in the photos that we set concrete pavers into the slab just in front of the doorway. To replicate this, buy the pavers ahead of time and lay out the full-size pattern on your driveway. Push all the pavers tightly together and measure the width and length. Add 1/4 in. to both measurements and build the inlay forms with this outside dimension.
Level the soil inside the forms and make sure you have about a 6-1/2 in. depth around the outer perimeter (dig slightly below the forms) and then gradually taper the slab to about 4 in. thick in the middle. Tamp any disturbed soil. Spray the inside of the forms with vegetable oil, then pour the concrete, set the anchor bolts and lay the pavers as shown in Photo 1 and Figure A.
Slab and stud layout detail
Figure A: Slab and Stud Layout Detail
Note: You can download Figure A and print it. Go to “Additional Information” below.
Step 2: Frame the walls
1 of 6
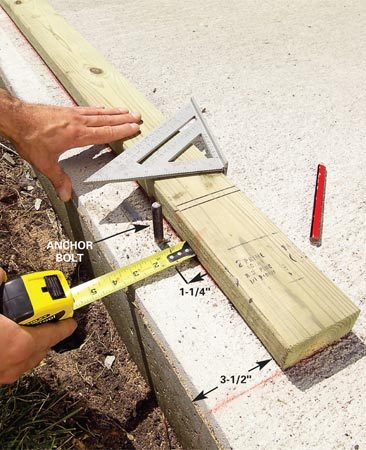
Photo 2: Cut and drill the plates
Snap lines on your slab to establish the wall plate locations. Set the treated wall plates against the lines and transfer the anchor bolt locations. Drill 5/8-in. diameter holes at the bolt locations.
2 of 6
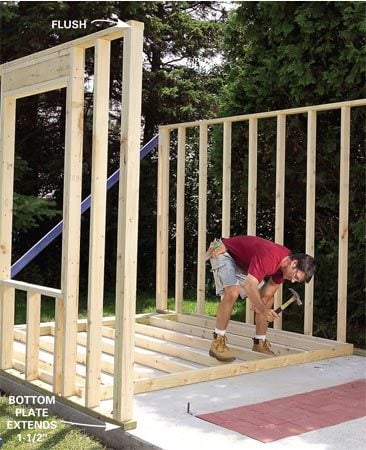
Photo 3: Assemble the walls
Cut the top and bottom plates and lay out the stud positions. Nail the plates to the studs with 16d cement-coated framing nails. Follow the layout in Figure A. Tip the walls into position, brace them and anchor them to the slab.
3 of 6
Photo 4: Plumb and brace each wall
Plumb each wall and nail a brace diagonally to hold it in position.
4 of 6
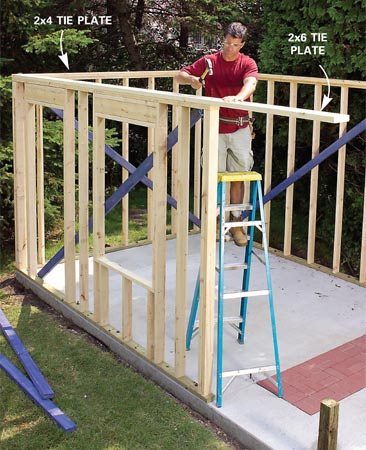
Photo 5: Nail on the tie plates
Cut and nail a 2x4 rear tie plate overlapping the side walls, then nail the 2x6 tie plates onto each of the tops of the side walls. Extend this plate 45-3/4 in. past the top plate.
5 of 6
Photo 6: Install the column supports
Cut 16-in. lengths of 4x4 and screw them to the post foundation hardware.
6 of 6
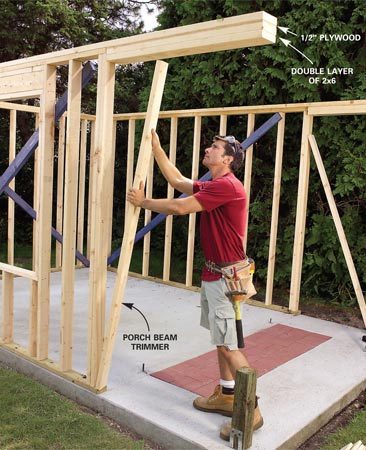
Photo 7: Assemble the porch beam
Create a porch beam with a 1/2-in. plywood filler and two 2x6s screwed to the underside of the extended tie plates. Next cut a 2x4 trimmer to support the beam and fill out each 12-ft. side wall.
Cut all the studs to 88-1/2 in. long. Lay out the top and bottom plates, starting at the back wall 16 in. on center as shown in Figure A.
You’ll notice that the two side wall bottom plates are 144 in. long and the top plates are 1-1/2 in. shorter. The extra 1-1/2 in. on the bottom plate is left to protrude and later will support the trimmer stud for the porch beam in the front (Photos 3 and 7).
Build the walls on top of the slab and tip them into position. Make the rough opening for the window to the frame dimensions of the window you purchase, and add 1/2 in. in width and in height for leveling and shimming.
Once the side and back walls are built, nail the tie plates to the top plates and plumb the corners, bracing them with long lengths of 2x4 (Photo 4). As you can see, the tie plates on the side walls are 2x6s instead of 2x4s.The extra width gives more bearing surface on top of the columns and ensures that the inside edge of the plate falls directly at the center of the column.
The front wall framing may be a bit confusing because we had to run the side wall tie plates all the way out to the columns. Assemble this wall in place, making sure to plumb up from the bottom plate.
You can see that you’ll have to notch the top plate (Photo 10) and the corner studs to fit around the porch beams, but once you finish that part, the rest of the wall and header follow traditional methods.
Figure B: Shed Framing Detail
Note: You can download Figure B and print it. Go to “Additional Information” below.
Step 3: Set the columns and sheathe the walls
1 of 6
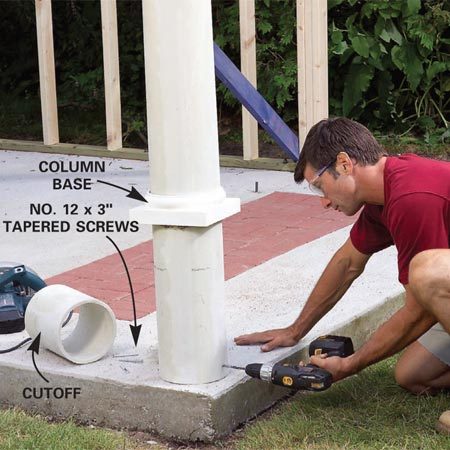
Photo 8: Cut and set the columns
Nail pieces of 3/4 in. x 3-1/2 in. pine to each side of the 4x4 posts. Cut the columns to length (88 in.) and slip them over the 4x4s. Predrill and countersink four evenly spaced holes and fasten the columns to the posts with No. 12 x 3-in. screws.
2 of 6
Photo 9: Fasten the column top
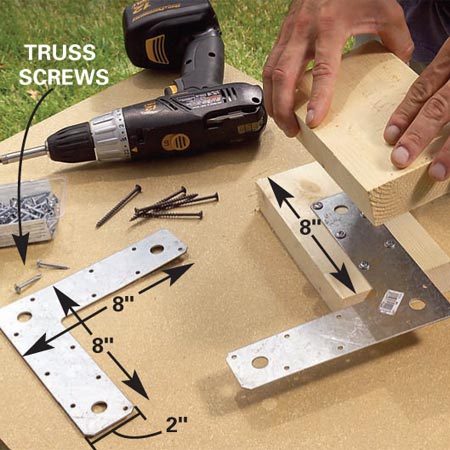
Rip two blocks to fit snugly into the tops of the columns. Screw the steel L-strap to one block, then screw the two blocks together with 3-in. screws. Insert the block assembly into the column, then drill pilot holes and screw through the column into the blocks. Next level the beam and screw the L-strap to the beam. Shim the top of the column tight to the beam with wood shims.
3 of 6
Close-up of the L-strap/block assembly
Sandwich one arm of the L-strap between the two blocks.
4 of 6
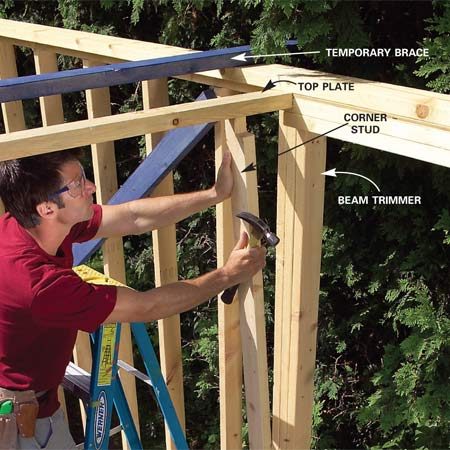
Photo 10: Frame the front wall
Notch the top plate for the front wall and nail it to the back of the porch beam on each side. Notch the corner stud to fit around the beam so that it's flush with the beam trimmer stud. Complete the front wall framing.
5 of 6
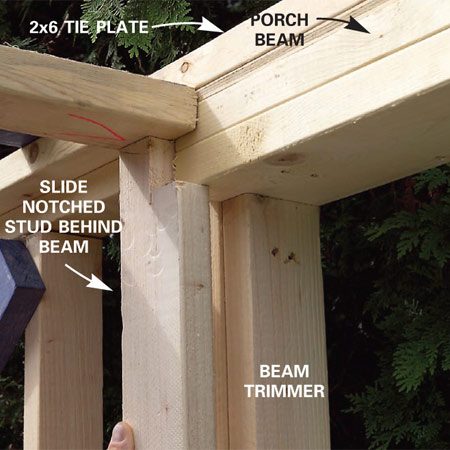
Notch the corner stud
Notch the front wall corner studs to fit around the 2x6 porch beam.
6 of 6
Photo 11: Sheathe the walls
Sheathe the side walls with 1/2-in. plywood starting at the back. Nail the plywood to the studs every 6 in. with 2-in. cement-coated nails.
The columns are made from a composite material that’s strong and durable. They’re designed to carry load-bearing weight and they paint up beautifully.
There are several ways to install them, but the method shown in Photos 8 and 9 works great for this project. Once you secure the 4x4 and nail 1x4 pine to each face, the outer dimensions of the post approximate the inside dimensions of the hollow column.
Buy a masonry-cutting blade for your circular saw to trim the bottom of the column to length because the material is extremely dense and hard. Drill the column with a 1/4-in. bit and a separate countersink bit 1-1/2 in. up from the bottom on four sides. To prepare the top of the column, cut the wood plugs and bracket as shown in Photo 9A and screw them into place.
Slip the special molded base onto the shaft, lift the column onto the post, rotate it for alignment and screw it into place with No. 12 taper-headed screws. Next screw the top metal angle (between the plugs at the top of the column) into the beam (Photo 9).
Step 4: Cut and assemble the rafters
1 of 6
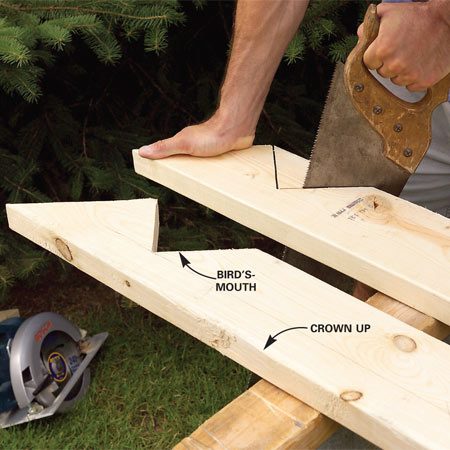
Photo 12: Cut the 2x6 rafters
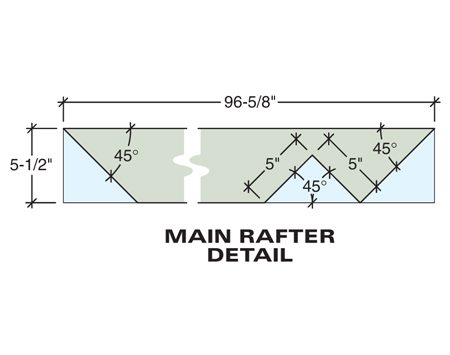
Cut all the rafters to the dimensions in Figure C. Select straight 2x6s and be sure to crown all the boards so any slight bow will rise to the top edge.
2 of 6
Photo 13: Cut the rafter tails
Draw a full-size pattern for the curved rafter tails from Figure C and cut it from a length of 2x8 using a band saw or jigsaw. Use this pattern to trace all the remaining rafter tails.
3 of 6
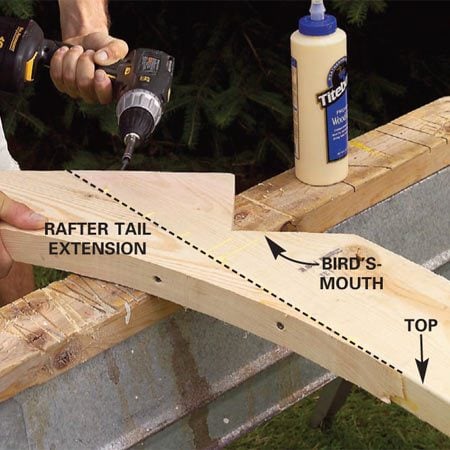
Photo 14: Add the rafter tail extensions
Glue and screw the curved rafter tail extensions to the ends of each rafter with 3-in. screws.
4 of 6
Photo 15: Join the rafter pairs
Fit the 45-degree end cuts and screw an L-strap across the miter on each side. Connect all 11 pairs. Then cut the two remaining pairs of rafters to 3-1/2 in. wide by ripping the inner edge.
5 of 6
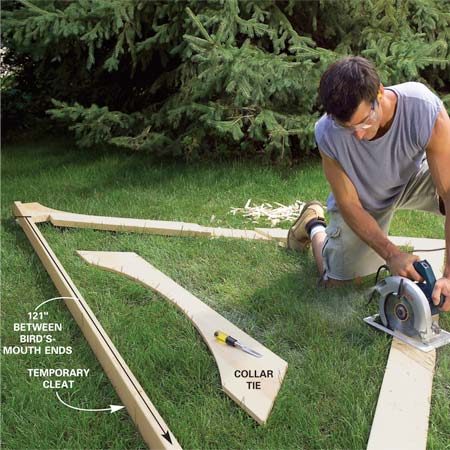
Photo 16: Notch the end rafters
Nail a temporary cleat to the bottom of the end rafter assembly to maintain the 121 in. between the bird’s-mouth ends. Measure down 38-1/2 in. from the top and mark the position of the collar tie. Set your circular saw at a 3/4-in. cutting depth and cut notches for the collar tie. Clean the bottom of the cut with a chisel.
6 of 6
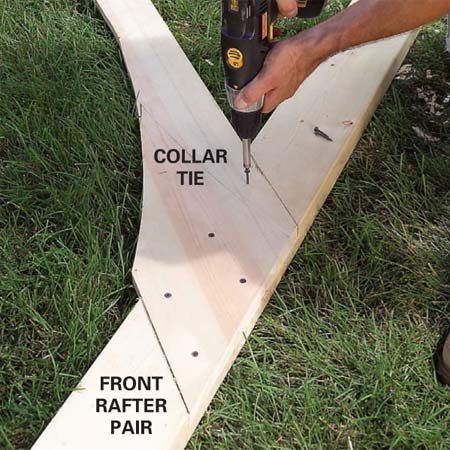
Photo 17: Install the collar ties
Glue and screw the collar tie to the notched rafters with 1-1/4 in. screws. The screws will be covered later by the 1x8 fascia trim.
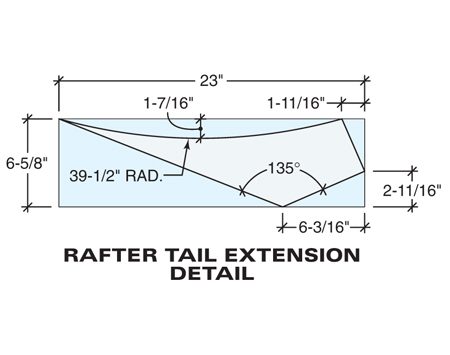
The biggest part of getting this or any other roof to work is consistent measurements and cuts on the rafters. That’s why it’s best to make one of each part and then trace from the pattern to make the remaining matched parts. This is a fairly easy roof to build because it’s a 12/12 slope, which means that every cut you make on the main rafter will be at 45 or 90 degrees. However, the roof extensions are another matter. The curved extensions are cut from 2x8 lumber and then glued and screwed to the rafters (Figure C).
To make the curved extensions, just cut a length of 2x8 and then rip the width to 6-1/2 in. Plot the points and cut the angles and then use a flexible ruler or thin stick to make a curve that goes through the points you’ve marked. Don’t worry about getting it perfect. Cut this curve and use it to mark all the others.
Glue and screw the extensions to the lower ends of each rafter, then assemble pairs of rafters at their tops with an 8-in. steel L-strap (see Shopping List below) on each side. Assemble them on a flat site to avoid twisting (Photos 15 – 17).
The last three rafter pairs (those toward the front of the shed) are different from the others. The 11th and 12th pairs above the porch must be cut 2 in. narrower. Just rip 2 in. from the underside of the rafters before you screw the pair together. These narrower rafters allow the tongue-and-groove ceiling to recess into the roof for a more elegant look.
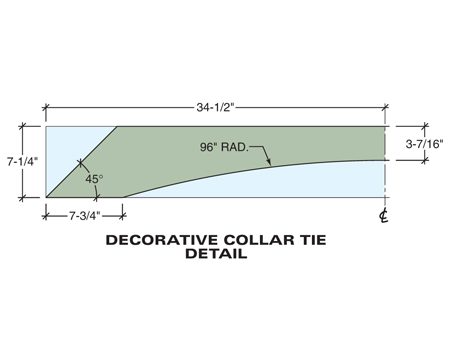
The last pair of rafters has a collar tie recessed across the front for added strength. Before you cut the recesses, tack a long 2x4 brace to the bottoms of the rafters as shown in Photo 16. Make sure the spread between the bird’s mouth ends is 121 in. Cut the curved collar tie, measure down 38-1/2 in. from the top of each rafter, lay in the collar tie and trace it. Now set your saw depth to 3/4 in. and cut away a recess with multiple passes of the saw.
Use a sharp chisel and rasp to smooth the bottom of the cutaway. Glue and screw the collar tie into the recess using construction adhesive and 1-1/4 in. galvanized deck screws, then remove the brace.
Rafter tail extension detail
Decorative collar tie detail
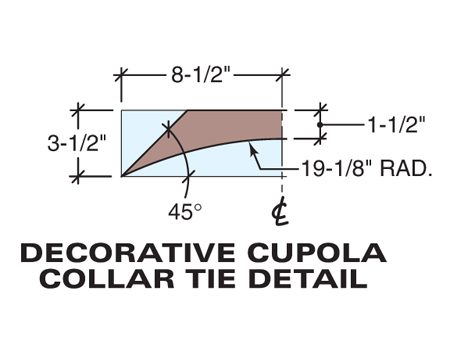
Decorative cupola collar tie detail
Figure C: Rafter Details
You can download Figure C and print it. Go to “Additional Information” below.
Step 5: Set the rafters
1 of 5
Photo 18: Set the rafters
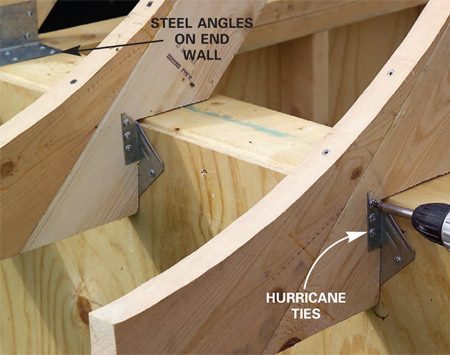
Lay out the rafter positions on the tie plates and position the hurricane ties. Nail the rafters to the plates.
2 of 5
Photo 19: Fasten the hurricane ties
Screw the hurricane ties to the rafters with 1-1/4 in. truss screws.
3 of 5
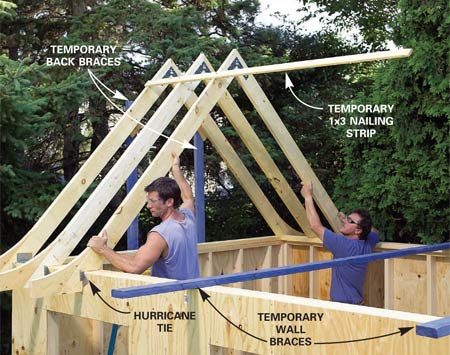
Photo 20: Temporarily space the rafter tops
Nail the tops of the rafter assemblies together with a long strip of 1x3 pine to maintain the correct spacing. Note the two cut-down rafter assemblies over the porch.
4 of 5
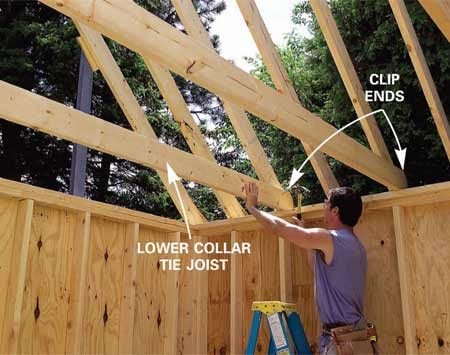
Photo 21: Install lower collar ties
Nail the three lower 2x6 collar tie joists to every other set of rafters, removing the temporary braces across the top as you go. Cut a 45-degree triangle from each joist end to keep them from protruding above the rafters.
5 of 5
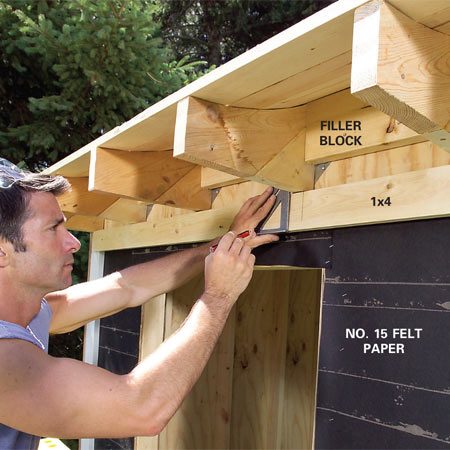
Photo 22: Add filler blocks
Nail 2x6 filler blocks to the walls between the rafter tail extensions. Make sure the blocks meet the curves of the rafter tails.
Mark the 16-in. on-center layout onto the tops of the 2x6 tie plates, starting from the outside edge of the rear wall framing. This way all the rafter pairs will be directly above the stud layout of the side walls below.
Nail the hurricane ties onto the wall, matching the layout. Grab a helper and set the rafters (Photo 18) onto your marks and toenail them to the top plate and screw them to the hurricane ties.
You’ll notice that the hurricane ties won’t work for the first and last sets of rafters, so here you’ll need to use steel angles as shown in Figure B. Note: Make sure you’ve left the braces across the tops of the walls (Photo 18) to keep the long side walls from bowing. Remove them only when you’re ready to install the collar tie joists (Photo 21).
Keep the rafters spaced evenly at the top with a 1x3 marked with the layout spacing, then nail the 1x3 near the top of each pair of rafters. It’s much easier to use a few 8-ft. pieces and overlap them than it is to use one long, cumbersome 16-ft. piece.
As soon as all the rafters are fastened, cut blocks from the cutoffs of the 2x6 rafters and nail them between the rafters against the side walls (Photo 22). Match the tops with the top curve of the rafter to seal the outside. Because of the hurricane ties, you may have a bit of trouble getting them to fit snugly. To solve this problem, set your circular saw at 2-1/2 degrees and back-cut both ends—they’ll tap into place much easier.
Step 6: Sheathe the roof
1 of 3
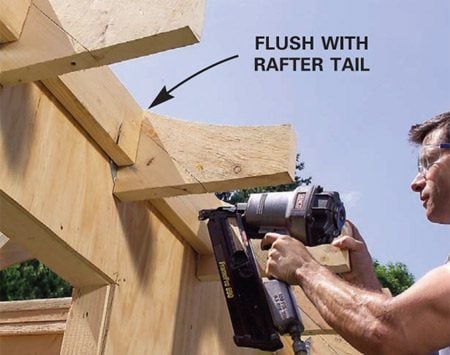
Photo 23: Nail 1x4s to the curves
Nail 1x4 pine to the rafter tail extensions with 2-in. nails, starting flush with the ends of the rafters and working your way up to the top (six courses) of the curve. Trim them flush with the front and back rafter assemblies after all the courses are installed.
2 of 3
Photo 24: Add shims to match plywood thickness
Nail shims against the top course of 1x4s to make up the 1/4-in. difference in thickness of the plywood roof sheathing. This will give you a clean transition from the 3/4-in. thick pine boards to the 1/2-in. plywood roof sheathing.
3 of 3
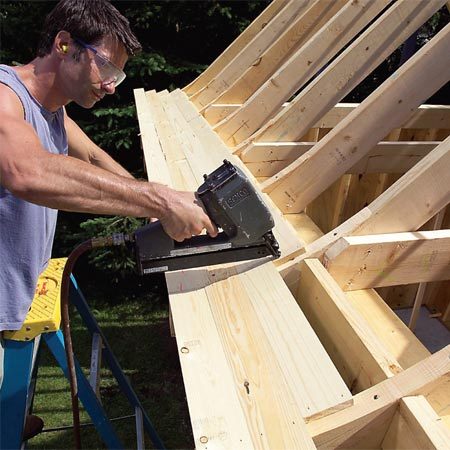
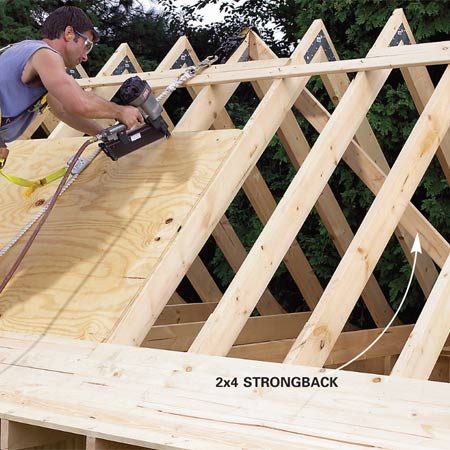
Photo 25: Complete roof sheathing with plywood
Angle a 2x4 strongback from the center top of the front wall to the sixth set of rafters (count from the back wall) to keep the rafters plumb. Then nail the plywood to the roof with 8d nails every 6 in. Have a helper lift the sheets while you stand on the curved section of the roof.
Because 1/2-in. plywood is tough to bend, the best material to sheathe the curved roof section with is 1x4 pine boards. Select your straightest piece to start flush with the ends of the rafter tail extensions. Nail it to each rafter (Photo 23) and keep the courses running straight.
Don’t bother to trim them flush with the front and back rafters until you’re finished nailing the six courses on each side. The boards are 3/4 in. thick, so in order to get the 1/2-in. plywood sheathing above to match in thickness, tack on shims with the thick side against the boards and the taper to the top (Photo 24).
The thickness and taper of the shim allows for a perfect transition. Continue nailing sheets of plywood to the rafters as you work your way to the top.
Figure D: Shed Trim
You can download Figure D and print it. Go to “Additional Information” below.
Step 7: Install the trim and siding
1 of 5
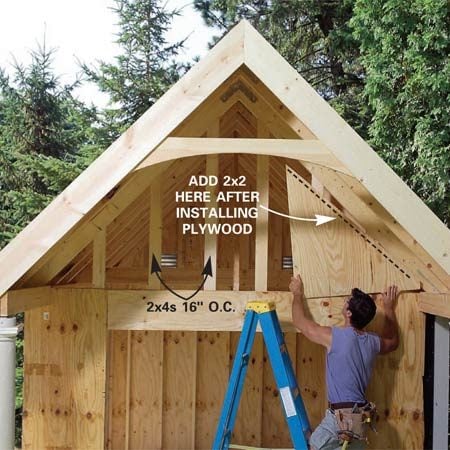
Photo 26: Frame the gable ends
Frame in the gable ends of the roof with 2x4 studs toe-nailed on 16-in. centers. Cut and nail the plywood to the studs. Next, nail 2x2 cleats over the sheathing, following the thinner rafters as a guide to create a nailing strip for the tongue-and-groove porch ceiling (Figure D). You'll also need to make nailing strips for the backside of the front rafter.
2 of 5
Photo 27: Install fascia boards
Cut and nail the front 1x8 fascia boards to the front rafter. Then scribe a piece to the roof curve, cut it with a jigsaw and nail it to the rafter end. Add small triangular piece as well at the top of the column.
3 of 5
Photo 28: Cut and install rafter trim
Tack a 1x4 up against the bottom of the rafters and scribe it to fit against the bottom of the filler blocks. Cut the notches with your jigsaw and nail it into place.
4 of 5
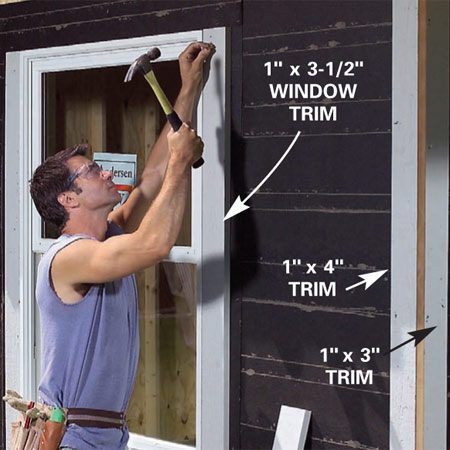
Photo 29: Nail up window, door and corner trim
Staple No. 15 felt paper to the outside of the sheathing and nail the 1-in. thick corner boards into place, then install your window and door trim.
5 of 5
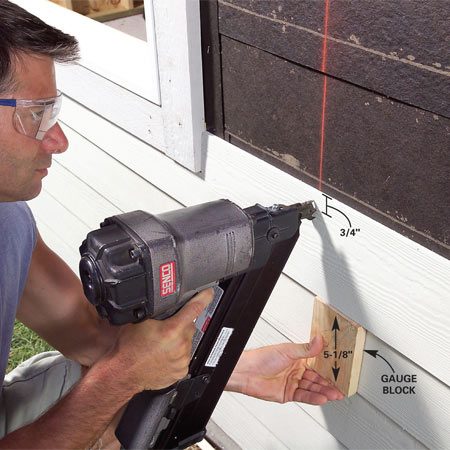
Photo 30: Nail on the siding
Nail a 5/16-in. x 1-in. starter strip at the bottom edge of the building to create a bevel and nail rows of cement lap siding through the sheathing into the studs. Use galvanized nails to nail the siding within 1 in. of the top of each course. Unlike with conventional wood siding, the nails will all be hidden by the next course. The nails in the top row will be exposed.
Now that you have the roof sheathed and trimmed flush with the rafters, finish framing and sheathing the front and back gables. Install the vents on the back upper wall as shown in Figure B.
Along the front gable wall, measure down 3-1/2 in. from the roof sheathing onto the gable plywood and snap lines. Cut and nail 2x2s along this line to match the bottom surfaces of the thinner rafter pairs over the porch. Do the same thing along the backside of the front rafters. Now you’ve created nailing surfaces with matched heights for nailing the 7-1/2 in. wide tongue-and-groove boards that create the porch ceiling.
Starting at the bottom of the wall sheathing, staple No. 15 felt paper around the entire building and cut out the openings for the doors and windows. Overlap each row at least 2 in. as you work your way to the top.
Next, install your window. We chose a window that has nailing fins along the outside perimeter instead of wood brick molding. This will allow you to add your own trim for a custom look.
To add to the low maintenance aspect of the exterior, we chose a material called Miratec for the corner, door and window trim. This is a composite that stands up to the weather and is highly rot resistant. You’ll need to rip the full 1-in. thick boards to width and then nail them into place. Note that the corners have two different widths so that when one overlaps the other and the whole corner is painted, the corners on all the walls looks equal.
Rip the doorjambs to 5 in. wide from 1x6 pine on your table saw and nail the jambs to the door trimmers on the sides and the header above. Be sure the jambs are flush with the sheathing. Next trim the door opening with 1-in. thick Miratec trim ripped to 3-1/2 in. wide. Be sure to flush the inner edges of the trim with the jambs instead of leaving a typical reveal.
Installing the siding
We chose fiber cement siding because it’s great looking and tough, and it holds paint for many years. Unlike wood or hardboard siding, cement siding is nailed within 1 in. of the top. The next course covers the nails, which makes for a nail-free surface.
Before you start, you’ll need to finish the upper trim just below the filler blocks as shown in Photo 28. Cut this 1x4 carefully and fit it around all the rafter ends. This piece will give the siding a finishing point when you get to the top of the wall. It is much easier to use a wood piece than to try to cut cement siding around all the obstacles.
To keep the courses of cement siding consistent around the shed, make a story pole from a long strip of wood and mark the reveal for each course onto the stick. Transfer these measurements to the outside corner trim and the door and window trim. This method, along with your gauge block (Photo 30), will give you consistent results. You’ll only have exposed nailheads at the top course and where two pieces butt together.
Step 8: Assemble and hang the doors
1 of 1
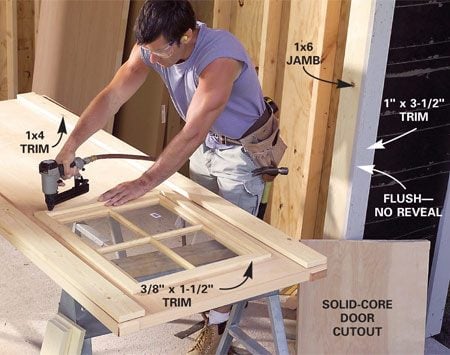
Photo 31: Modify a solid core door
Cut the window opening from a solid-core door and nail thin stop inside the cutout to support the window sash. Next install the sash and the trim. Glue and nail battens on the door as shown in Figure D. Shim the doors into the opening and then install face-mounted hinges with painted lag screws.
To save the expense of a custom paneled door, we chose to add pine boards to a solid-core exterior flush door (Photo 31) and then add windows. Just lay your door across sawhorses and cut the opening about 1/4 in. wider and taller than your window sash.
Depending on the thickness of the sash, you’ll need to make window stop for the backside of the opening so that the front of the sash sits flush with the door surface. Next, cut 3/8-in. x 1-1/2 in. pine moldings with your table saw and picture frame the window. To create a custom paneled door for the front and side entry doors, we cut 3/4-in. thick pine and glued and nailed it to the flat door surface as shown (Photo 31 and Figure D). Use 1x4s for the upper crosspieces and center stile and a wider 1x6 for the lower rail.
Once you’ve built the doors, you’ll need to set them into the opening and shim them flush with the door casing. Leave about a 1/16-in. gap on the side jamb and about 1/4 in. at the top and bottom. With the door shimmed in place, drill pilot holes for the hinges and install them with 2-in. lag screws.
Choose hinges with wide flanges so the screws will go through the trim and enter the trimmer stud behind. Hang the other doors in the same manner.
Step 9: Build the cupola
1 of 3
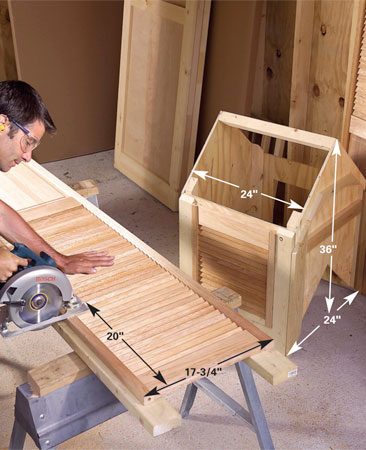
Photo 32: Assemble the cupola
Build the 24-in. square cupola box from 1/2-in. plywood and 2x2s for the inside corners. Cut holes and mount sections of a louvered bifold door for ventilators on each side of the cupola.
2 of 3
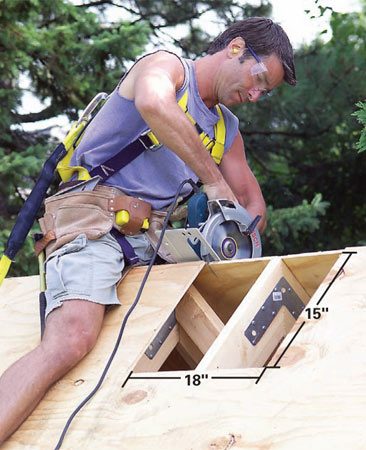
Photo 33: Cut the roof hole
Cut the opening for the cupola. Then lift the roofless cupola and position it over the hole. Screw the 2x2 cupola cleats to the roof sheathing.
3 of 3
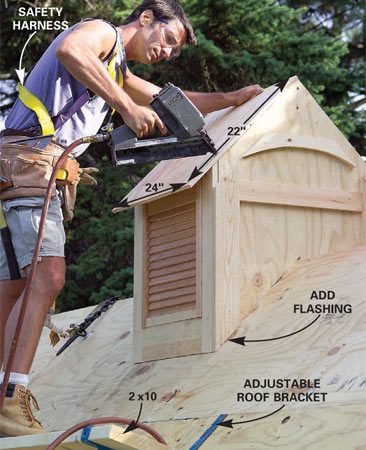
Photo 34: Install the cupola
Nail the roof panels to the cupola and add the trim. Now you're ready to shingle!
Cut two identical pieces of plywood 23 in. wide and 36 in. tall for the front and back. Measure up the sides 24 in. and cut a 45-degree angle at the top of each piece, then cut out the notch in the bottom at 45 degrees to conform to the roof.
The right and left sides of the cupola are 24 in. square. Cut 2x2s to length to fit into each corner and then nail the sides to the front and back through the 2x2s to create a box with exterior dimensions of 24 in. Next, nail in the 2x2 ridge between the peaks of the gable ends.
To complete the cupola, just cut openings in the sides for the louvers and then cut the louvers from a bifold door. We purchased a 36-in.bifold door at a home center and used only half of it (Photo 32).Nail the louvered sections to each side and then nail 2x2s along the roof cutouts in the front and back.
Cut a hole in the roof sheathing with your circular saw (Photo 33) for the cupola, then carry the unfinished cupola up to install it while it’s still lightweight enough to maneuver. Position the cupola on the roof opening and then screw it to the roof from underneath, through the roof sheathing into the 2x2s.Next, add the roof pieces and the trim as shown in Figure D.
Many thanks to family handyman for sharing this DIY project.


No comments:
Post a Comment